When discussing Android performance, Jank, Responsiveness, and ANR are usually grouped together because their causes are similar. They are simply categorized based on severity: Jank, Slow Response, and ANR. We can define “Broad Jank” to include all three. If a user reports that a phone or App is “stuttering,” they are likely referring to Broad Jank, and we must identify which specific issue is occurring.
If it’s stuttering during animation or list scrolling, we define it as Narrow Jank (referred to as Jank). If it’s slow app startup, slow screen wake-up, or slow scene switching, we define it as Slow Responsiveness (referred to as Slow). If it’s an ANR, it’s an Application Not Responding issue. Each situation requires different analysis and resolution methods.
Furthermore, within Apps or manufacturers, Jank, Responsiveness, and ANR have individual metrics like Frame Drop Rate, Startup Speed, and ANR Rate. Mastering the analysis and optimization of these issues is crucial for developers.
This is the second article in the Responsiveness series, using Android App Cold Start as an example to explain how to use Systrace for analysis.
Table of Contents
- 1. Preparation
- 2. Analysis of Android App Cold Start Flow
- End
- Series Articles
- References
- About Me && Blog
If you are not familiar with the basic use of Systrace (Perfetto), please catch up on the Systrace Basics Series first. This article assumes you are already familiar with using Systrace (Perfetto).
Systrace Series Articles:
- Introduction to Systrace
- Systrace Basics - Prerequisites for Systrace
- Systrace Basics - Why 60 fps?
- Android Systrace Basics - SystemServer Explained
- Systrace Basics - SurfaceFlinger Explained
- Systrace Basics - Input Explained
- Systrace Basics - Vsync Explained
- Systrace Basics - Vsync-App: Detailed Explanation of Choreographer-Based Rendering Mechanism
- Systrace Basics - MainThread and RenderThread Explained
- Systrace Basics - Binder and Lock Contention Explained
- Systrace Basics - Triple Buffer Explained
- Systrace Basics - CPU Info Explained
- Systrace Smoothness in Action 1: Understanding Jank Principles
- Systrace Smoothness in Action 2: Case Analysis - MIUI Launcher Scroll Jank Analysis
- Systrace Smoothness in Action 3: FAQs During Jank Analysis
- Systrace Responsiveness in Action 1: Understanding Responsiveness Principles
- Systrace Responsiveness in Action 2: Responsiveness Analysis - Using App Startup as an Example
- Systrace Responsiveness in Action 3: Extended Knowledge on Responsiveness
- Systrace Thread CPU State Analysis Tips - Runnable
- Systrace Thread CPU State Analysis Tips - Running
- Systrace Thread CPU State Analysis Tips - Sleep and Uninterruptible Sleep
1. Preparation
This case study and the corresponding Systrace are engineering-focused and omit many details, as App startup involves a vast range of knowledge. For an extremely detailed breakdown, I recommend: Complete Analysis of Android App Startup Flow.
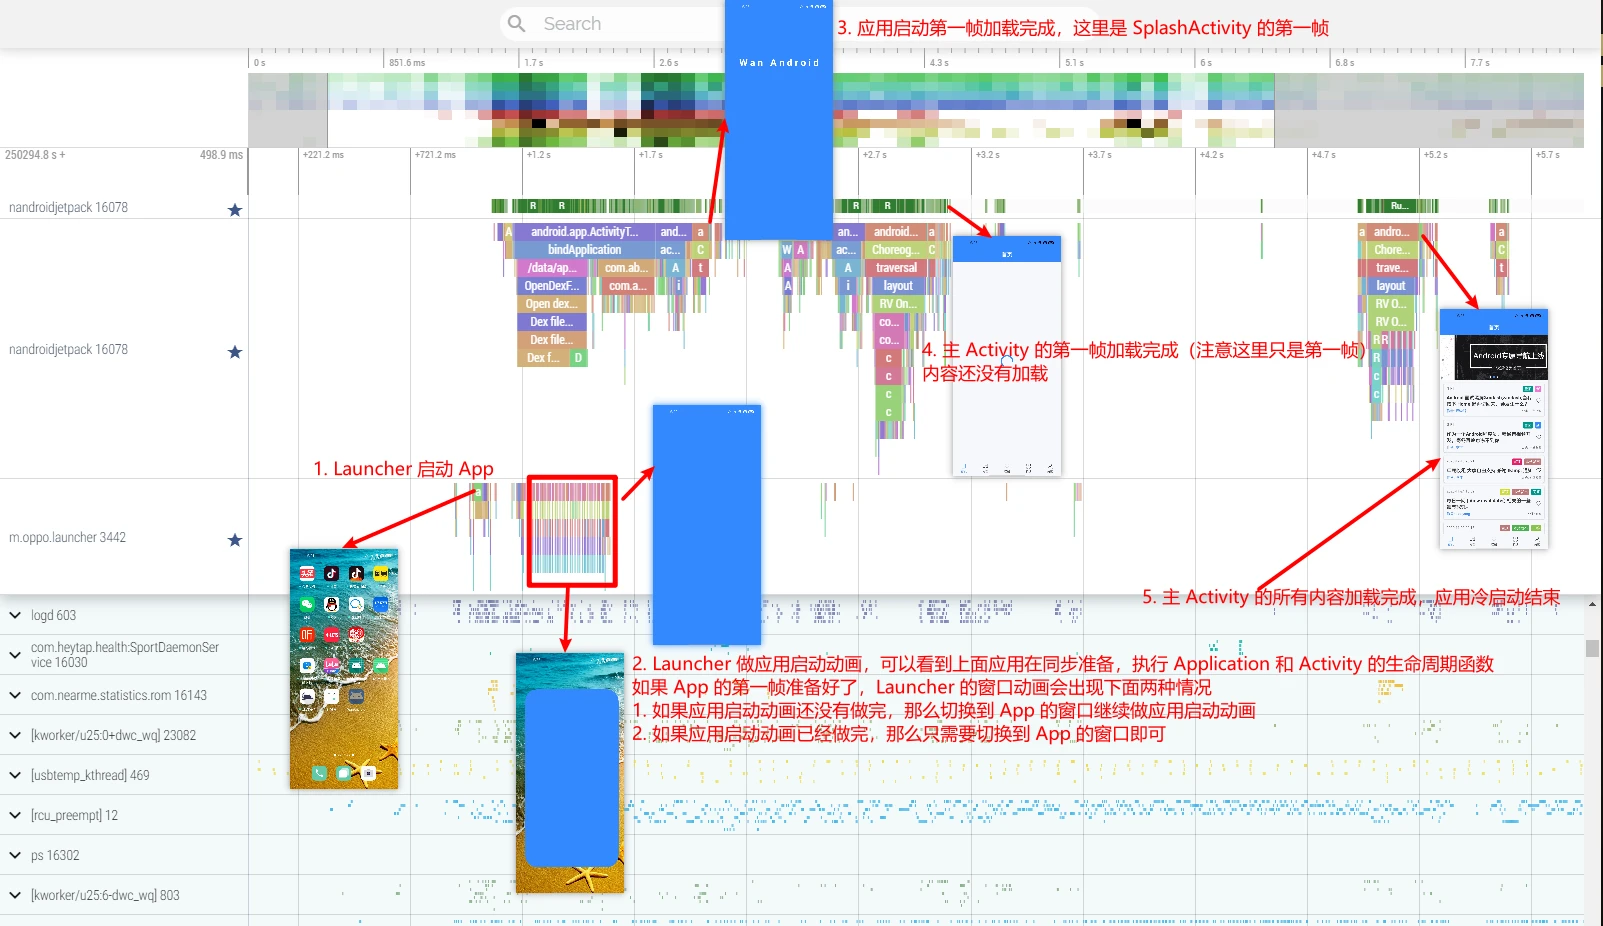
We will use Systrace as our main thread to explain the high-level workflow of key modules during startup. After understanding the overview, you can dive into specific areas of interest. Here is a mapping of Systrace segments to phone screenshots (this blog uses Perfetto and Systrace interchangeably):
To more effectively analyze cold starts, perform these preparations:
- Enable Binder Debugging: This displays Binder function names in Trace (requires Root).
- Start IPC Debug:
adb shell am trace-ipc start - Stop and dump:
adb shell am trace-ipc stop --dump-file /data/local/tmp/ipc-trace.txt
- Start IPC Debug:
- Add the
irqTag: Default Trace commands don’t includeirq. Adding it reveals interrupt details. Example command:
python systrace.py gfx input view webview wm am sm rs bionic power pm ss database network adb idle pdx sched irq freq idle disk workq binder_driver binder_lock -a com.xxx.xxx(replacecom.xxx.xxxwith your package name or omit-afor global). - Recommended Tool: If the App is buildable (your own project), integrate the TraceFix library (see Gracker/TraceFix). It uses code instrumentation to insert Trace points into every function, providing deep visibility into App logic.
- Without the plugin: You only see Framework-level Trace points.
- With the plugin: Trace data is significantly enriched with App-specific logic (note: only App logic is instrumented, not Framework code).
- Without the plugin: You only see Framework-level Trace points.
2. Analysis of Android App Cold Start Flow
This case covers cold starting an Android App from the Launcher. The flow spans from the first screen touch to the final UI display, involving:
- Touchscreen interrupt handling.
InputReaderandInputDispatcherevent processing.- Launcher input handling.
SystemServerstartup event processing.- Startup animations.
- App internal startup and logic.
As noted in Part 1, the Start is the input event, and the End is the App being fully interactive for the user.
We’ll trace this through Systrace’s key stages:
2.1 Touchscreen Interrupt Handling
When a finger touches the screen, the touchscreen triggers an interrupt. The earliest trace in Systrace appears here:
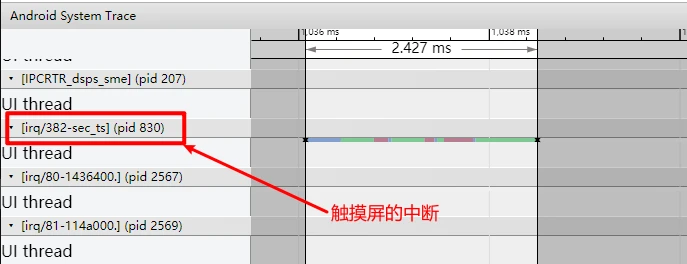
Corresponding cpu ss zone and Interrupt zone (visible with irq tag):
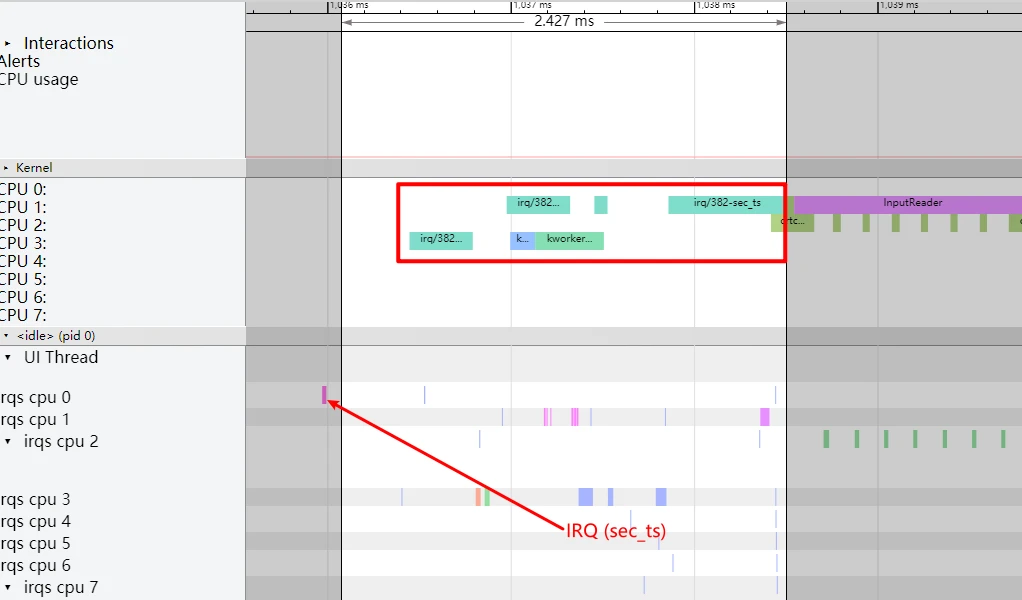
Typically, a touch triggers several interrupts. The touchscreen driver updates these coordinates into EventHub for InputReader and InputDispatcher. Manufacturers focus on tuning this step.
2.2 InputReader and InputDispatcher Stage
These Native threads in SystemServer handle input events. See Input Explained for details.
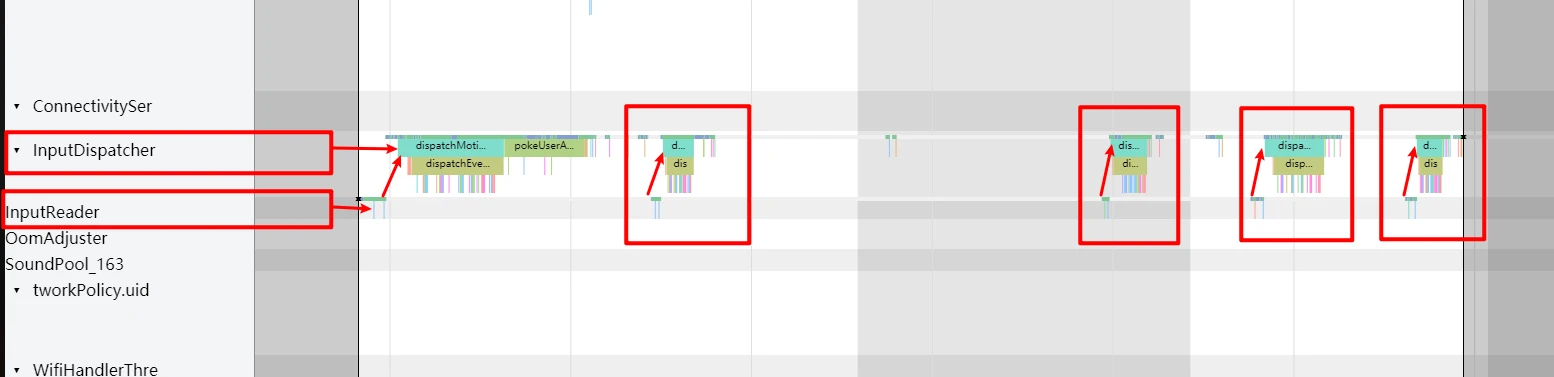
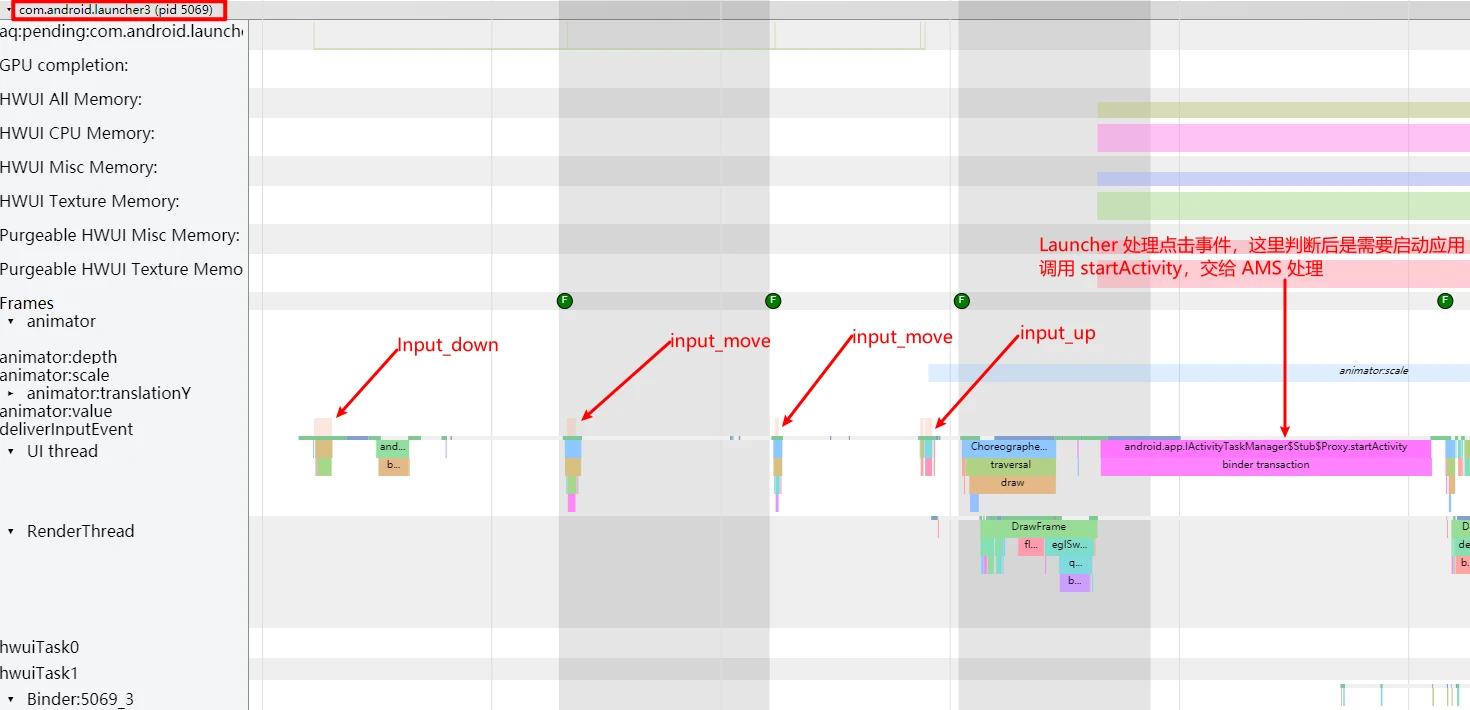
For an icon click, the reported events include Input_Down, several Input_Move, and one Input_Up, forming a complete click sequence.
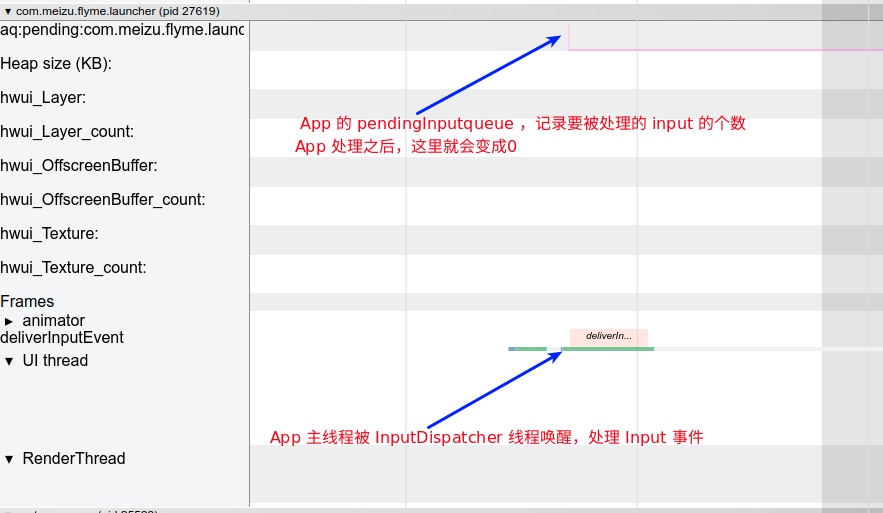
Since Launcher is in the foreground and visible, it receives these events. Tracing their flow through SystemServer and App is detailed in Input Explained; here are the core visualizations:
2.2.1 Event Flow in SystemServer

2.2.2 Event Flow in Launcher
2.3 Launcher Input Handling Stage
Launcher handling is a key segment of response time, involving two metrics:
- Click to Launcher First Frame Response: Launcher usually dims the App icon upon receiving
Down(or plays a shrink animation) to confirm receipt. - First Frame Response to App Launch: Time from processing the icon click to receiving
Upand deciding to launch.
Note: Desktop Swipe Response Time (from finger movement to desktop’s first frame of movement, measured via high-speed camera) is also a critical system metric targeted for optimization.
In a cold start, Launcher receives Up, completes its logic, and hands off to AMS (returning to the SystemServer process).
This stage is usually of interest to system engineers. In recent versions, startup animations are collaborated on by Launcher and SystemServer to ensure visual continuity. Icons can now have layers or custom animations and dynamics that were impossible with pure SystemServer animations.
2.4 SystemServer StartActivity Stage
SystemServer handles:
- Processing the launch command.
- Notifying Launcher to Pause.
- Forking the new process.
Processing the Launch Command
The Binder call in SystemServer is triggered by Launcher via ActivityTaskManager.getService().startActivity.
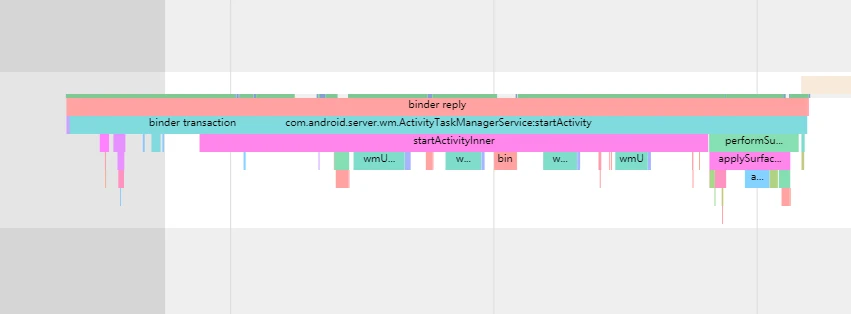
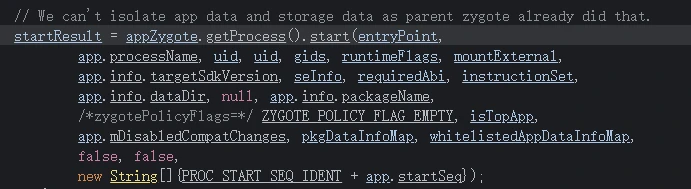
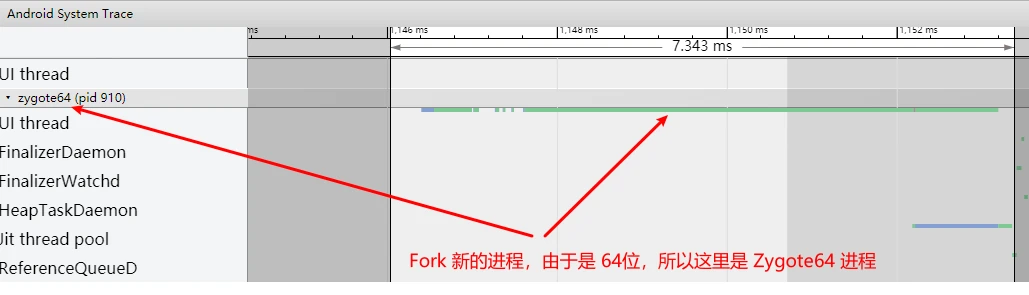
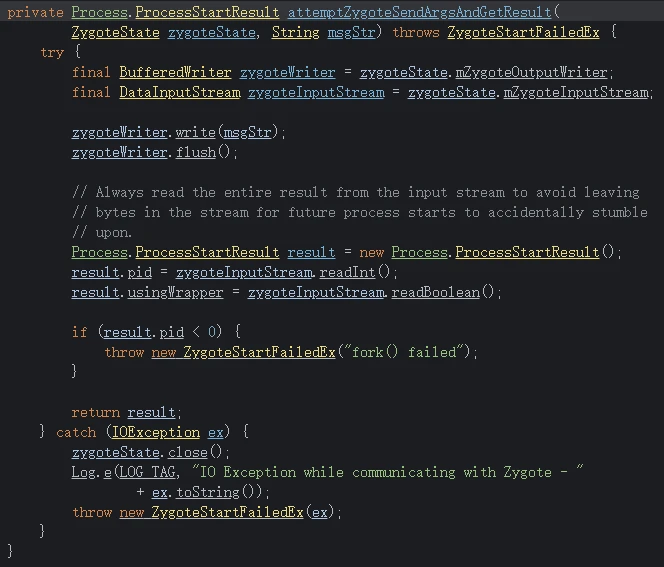
If the App process isn’t running, SystemServer must first start the process, then the Activity. This is the hallmark of a cold start. It forks from Zygote64 (or Zygote32 for some Apps).
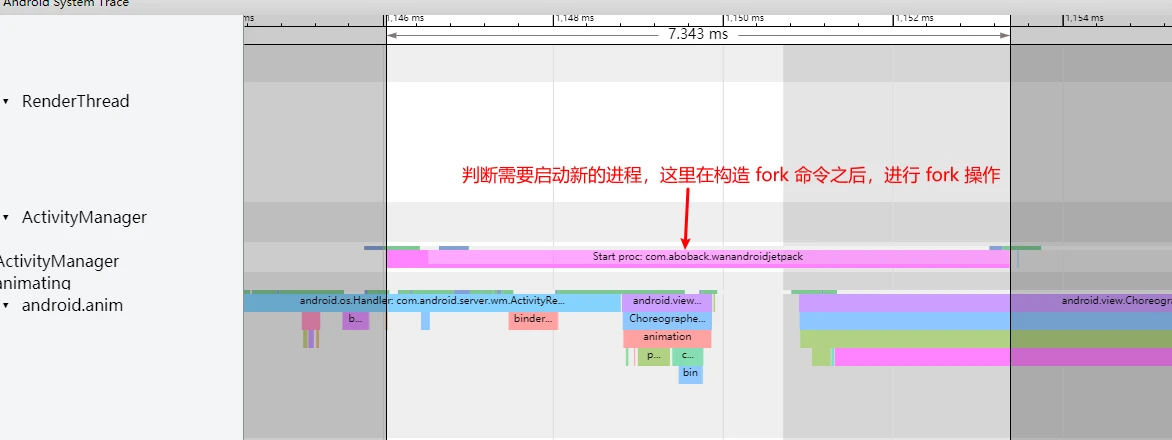
Zygote 64 Executing Fork
App Process Appearance
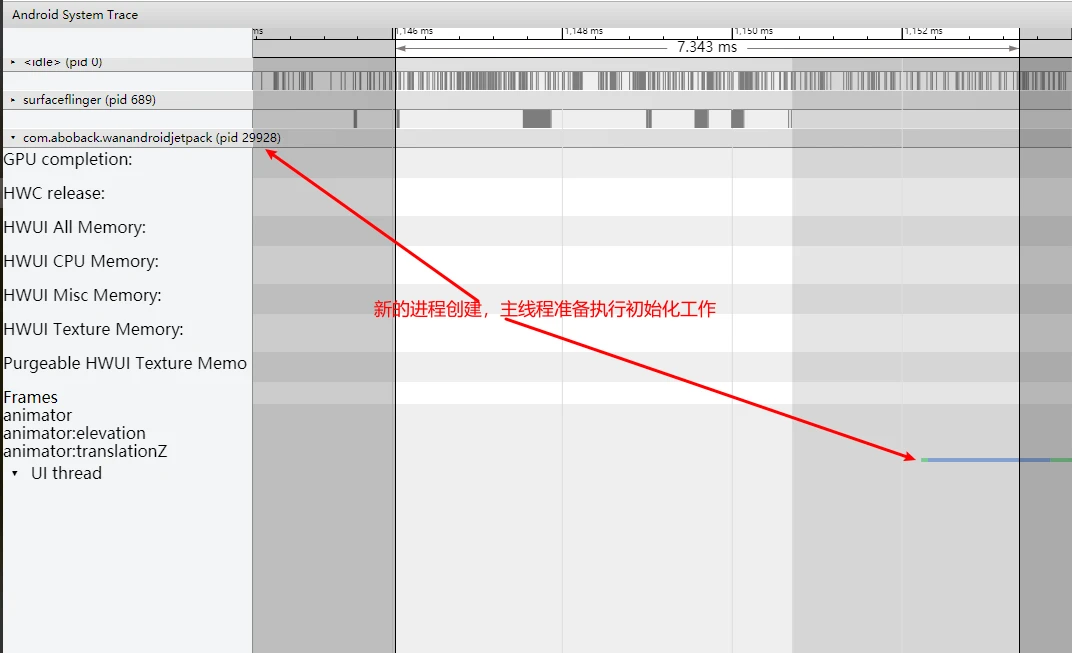
Corresponding code: the App now enters its own process logic.
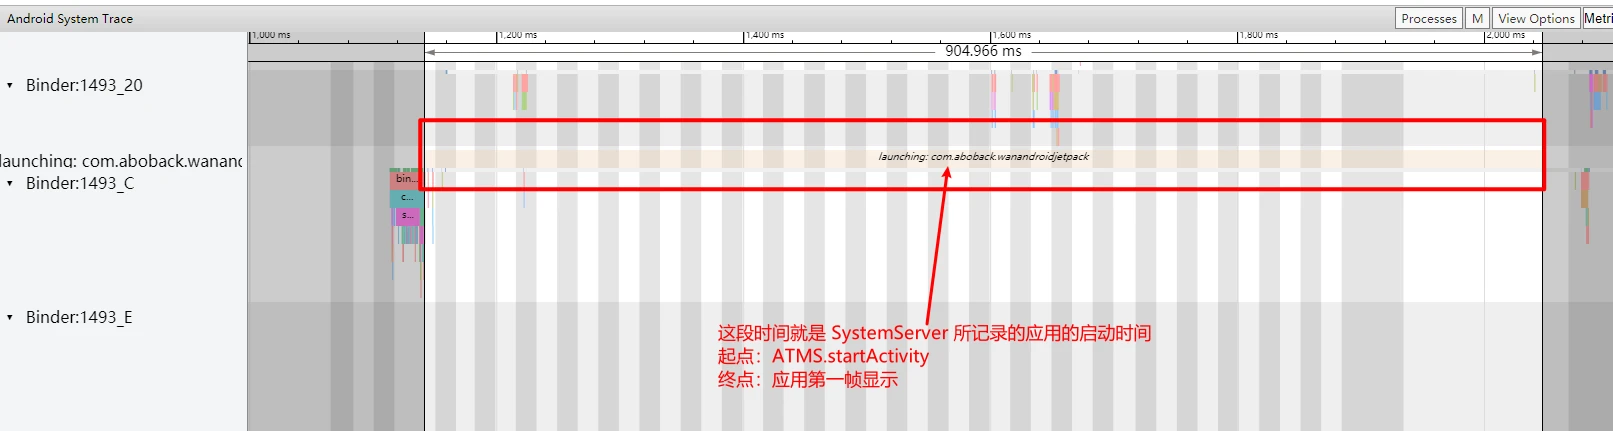
After startup, SystemServer records the time from startActivity to the first frame display. In Systrace, this is marked as shown below (Note: this ends at the first frame. If your App flow is SplashActivity -> MainActivity, this only covers SplashActivity).
2.5 App Process Startup Stage
Large-scale Apps typically categorize cold start into three parts. Each step slows down the overall speed. Define your “End” point clearly with testers (usually where the UI is stable).
- Process Start to SplashActivity First Frame (or directly to MainActivity if no Splash).
- SplashActivity First Frame to MainActivity First Frame.
- MainActivity First Frame to Fully Loaded.
Analysis details for each:
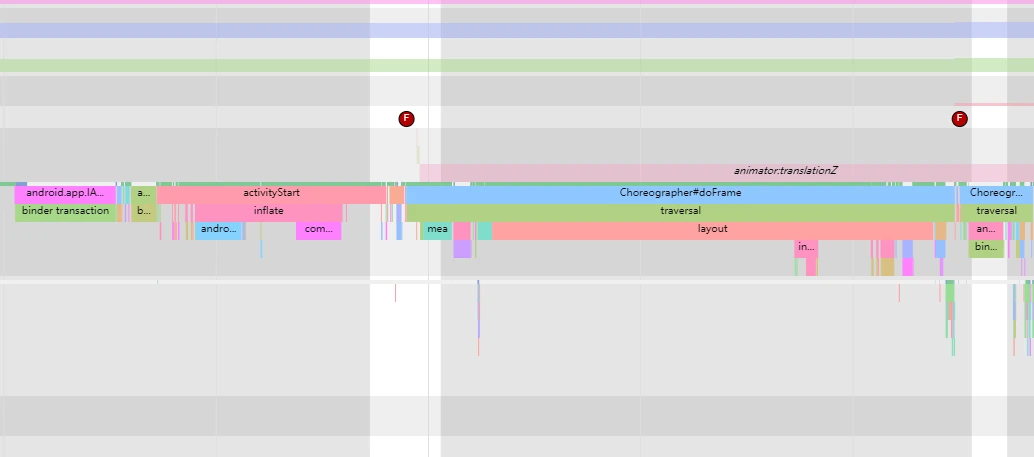
Process Start to SplashActivity First Frame
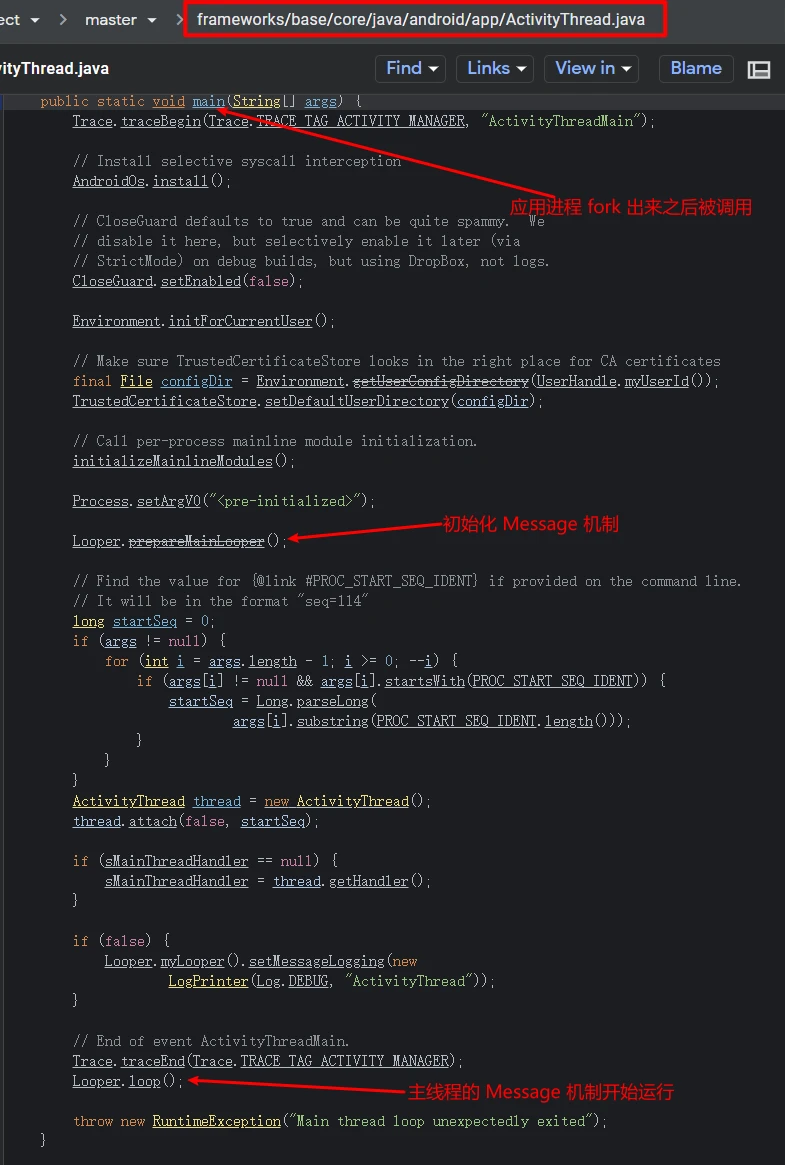
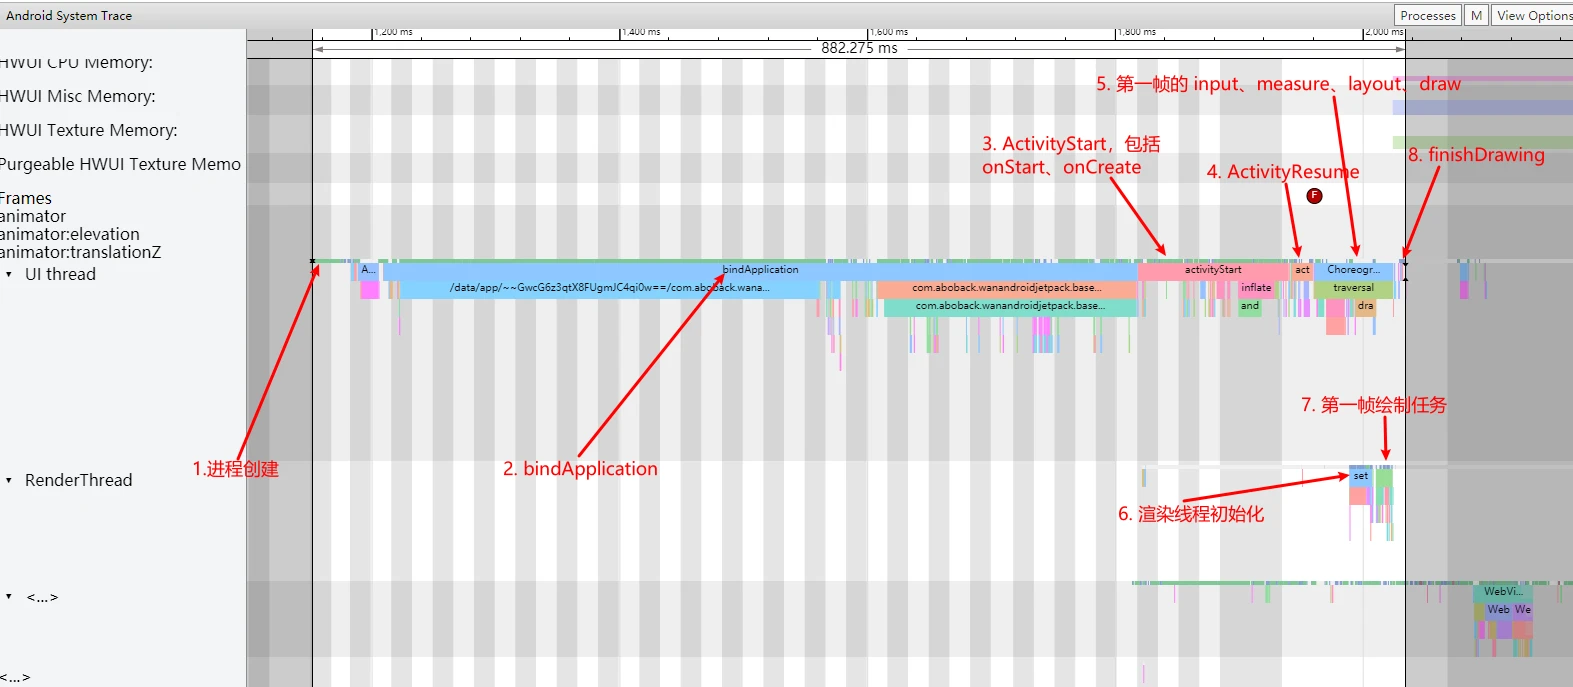
Post-fork, the App must execute bindApplication (the core differentiator for cold vs hot starts). Once the environment is ready, it starts components (Activities here; Services, Broadcasts, or Providers would pre-empt Activity if they triggered the process).
Activity lifecycle functions (onStart, onCreate, onResume) execute, followed by one Choreographer#doFrame (measure/layout/draw), RenderThread initialization, and the final SurfaceFlinger Vsync cycle composition. The first frame then physically displays (at the finishDrawing marker). See MainThread and RenderThread Explained.
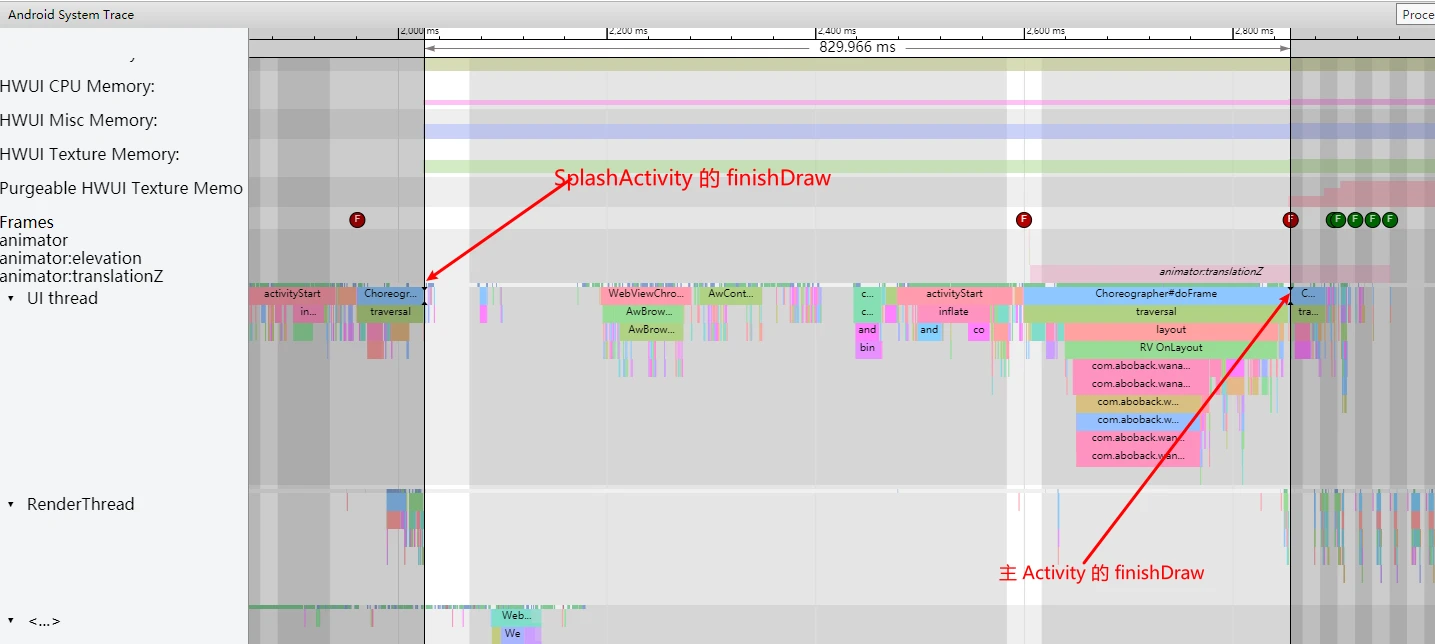
SplashActivity to MainActivity
Many Apps use a SplashActivity for ads. This involves another Activity creation cycle, business logic, WebView initialization, etc., leading to the MainActivity first frame.
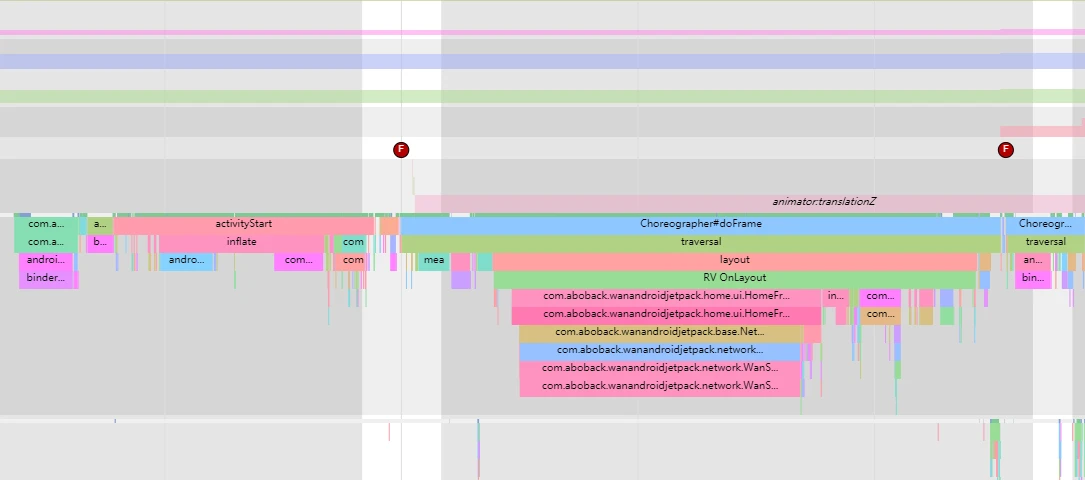
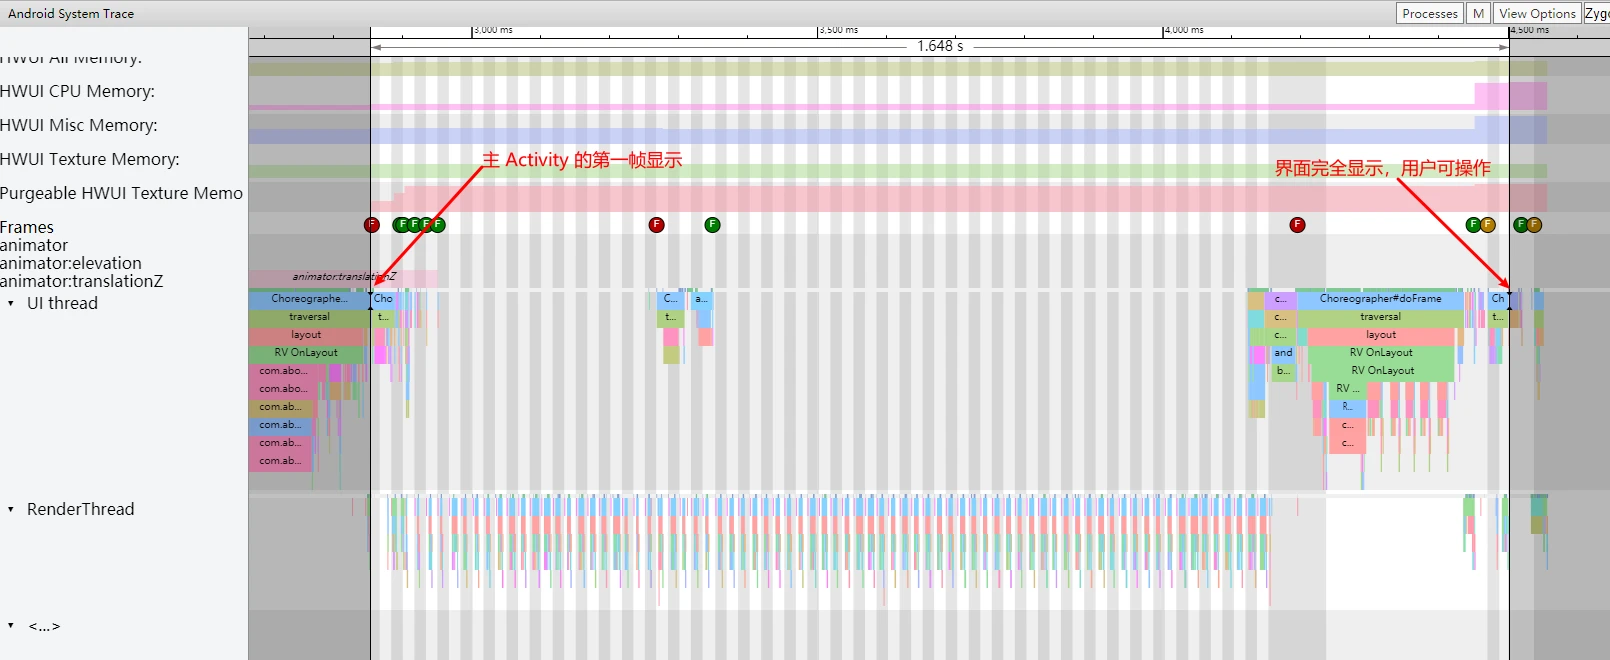
MainActivity First Frame to Fully Loaded
A MainActivity often takes multiple frames to load fully as resources (like images) are asynchronously fetched. The first frame might just be a wireframe. Systrace alone is hard for defining the “Fully Loaded” point unless you use a custom Systrace Tag (e.g., in a View’s onDraw or when a List finishes and item count $> 0$).
Demonstration using a Systrace + Screenshot hybrid (from an open-source WanAndroid client):
End
This article focuses on visualizing the complete cold start flow in Systrace to help you locate bottlenecks and perform competitive analysis.
- For “How to Analyze,” see the routine in Understanding Responsiveness Principles.
- For “How to Optimize,” see Complete Record of Android App Startup Optimization. Optimization techniques evolve; I’ll maintain that article. If you find new techniques, leave a comment or contact me via WeChat (553000664).
Series Articles
- Systrace Responsiveness in Action 1: Understanding Responsiveness Principles
- Systrace Responsiveness in Action 2: Responsiveness Analysis - Using App Startup as an Example
- Systrace Responsiveness in Action 3: Extended Knowledge on Responsiveness
- Link to Systrace Basics Series
References
- Analysis of Android App Startup Flow
- Investigation: Can App Startup Really Reduce Startup Time?
- Jetpack App Startup Explained
- App Startup Official Guide
- Complete Record of Android App Startup Optimization
- Android Application Profiling
About Me && Blog
Below is my personal intro and related links. I look forward to exchanging ideas with fellow professionals. “When three walk together, one can always be my teacher!”
- Blogger Intro: Includes personal WeChat and WeChat group links.
- Blog Content Navigation: A guide for my blog content.
- Curated Excellent Blog Articles - Android Performance Optimization Must-Knows: Welcome to recommend projects/articles.
- Android Performance Optimization Knowledge Planet: Welcome to join and thank you for your support~
One walks faster alone, but a group walks further together.